
How to add the Legal Notice block to multiple product templates
Overview
The Legal Notice block is added to a product template, not to your store as a whole. If your store uses more than one product template, the notice appears only on the products using a template that has the block.
Shopify has no way to add an app block to several templates at once. This is a limitation of the theme editor, not of the app, and no app can work around it. Each template has to be opened and edited separately.
This article shows how to do that. The steps are short, and you repeat them once per template.
What you need
- The app installed and the notice already working on your main product template. If it is not, start with How to install and set up Pandectes EU Warranty & GARAN.
- Access to Online Store > Themes on your published theme.
Why the notice is missing on some products
A Shopify product can be assigned to an alternate template, for example product.bundle or product.subscription. Merchants create these for bundles, subscriptions, gift cards, or a different layout on a group of products.
The result on the storefront looks inconsistent:
The product uses | What the shopper sees |
|---|---|
A template that has the Legal Notice block | The notice, under Add to cart |
A template without the block | Nothing at all |
This is the most common reason the notice works on most products but not on a few.
Check the Dashboard first
Open Shopify Admin > Apps > Pandectes EU Warranty & GARAN. On the Storefront status card, the Widget (Product) row warns you when other product templates do not have the block yet, for example "4 other product templates don't show Legal Notice yet."
Select View templates to see which ones. Those are the templates to work through in the steps below.
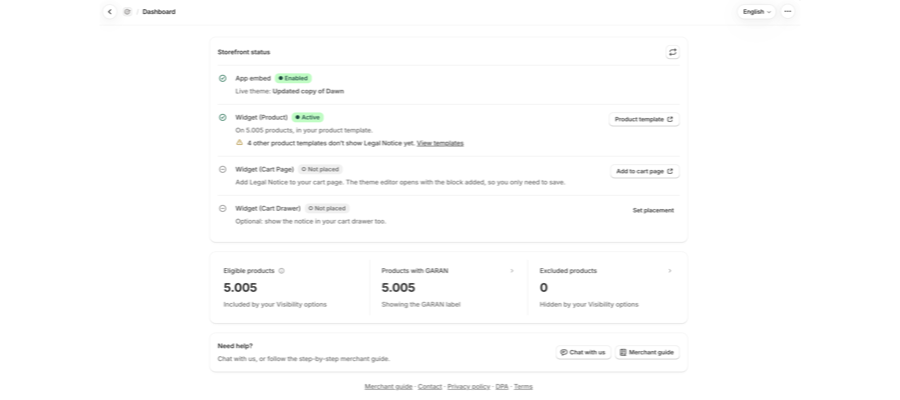
The same row also warns you if Legal Notice was added twice in one template. Remove the extra block in the theme editor and save, so the notice shows only once.
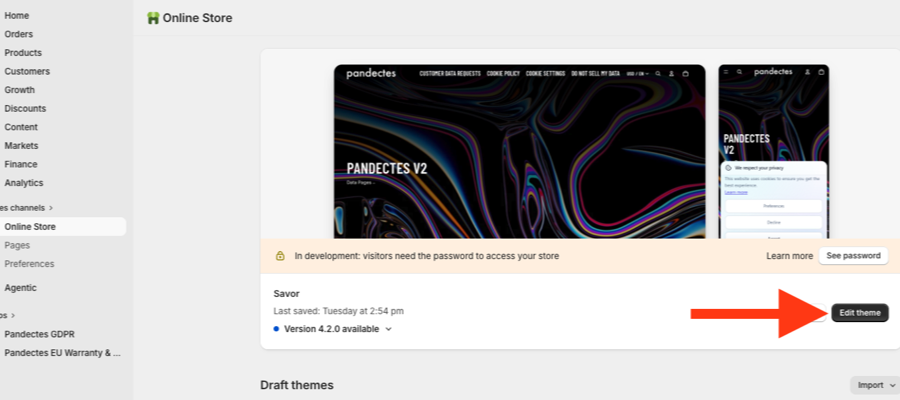
Step 1: Open the theme editor
Go to Online Store and select Edit theme on your published theme.
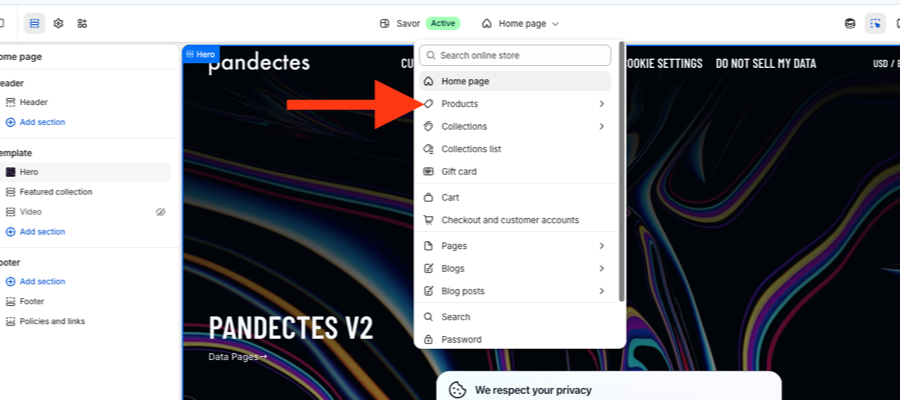
Step 2: Open the template picker
At the top of the editor, open the page selector and choose Products.
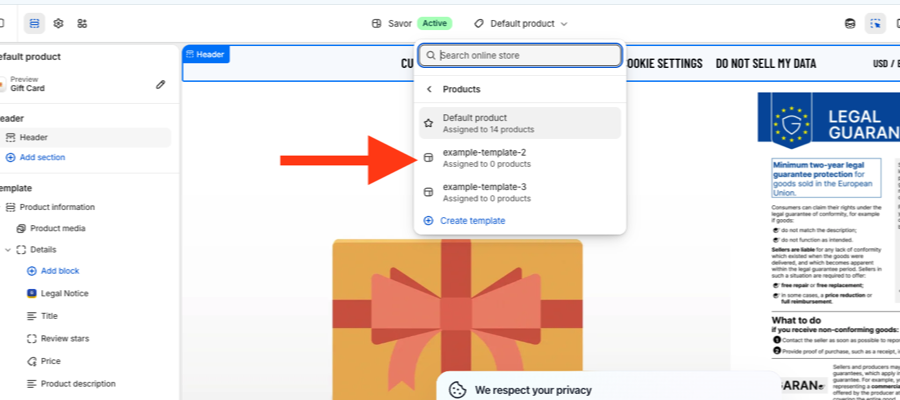
Step 3: Open a template
You now see every product template in the theme, with the number of products assigned to each one. Default product is the one most stores use, and the others are the alternate templates.
Open the first template that still needs the block.
Step 4: Add a block where you want the notice
In the left sidebar, find the section holding your product details, usually Product information > Details, and select Add block at the position where the notice should appear.
Placing it under Buy buttons matches the product page placement used everywhere else.
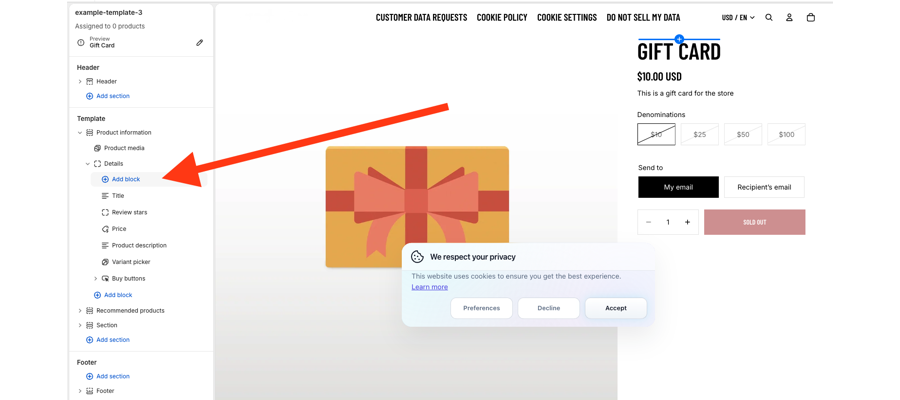
Step 5: Pick the Legal Notice block
In the block picker, switch to the Apps tab and select Legal Notice (Pandectes EU Warranty & GARAN). You can also type Pandectes in the search field.
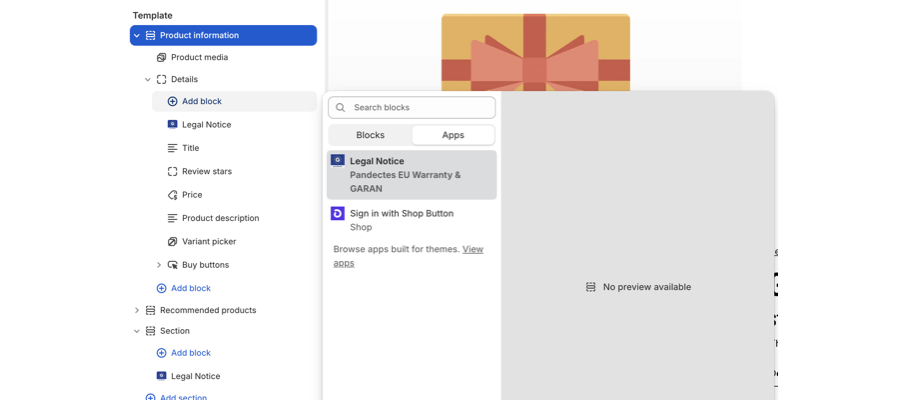
The block has no settings of its own. Everything about the notice is controlled in the app, under Notice & label and Visibility options, and applies to every template at once.
Step 6: Save
Select Save in the top right. The notice now renders on every product assigned to this template.
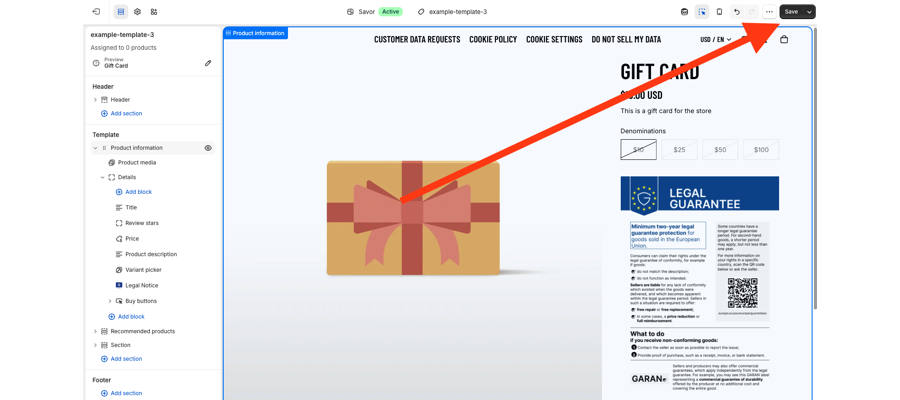
Step 7: Repeat for each remaining template
Go back to the page selector, choose Products again, open the next template, and repeat steps 4 to 6.
There is no shortcut and no bulk action. A store with four product templates needs the block added four times.
Check the result
- Open Shopify Admin > Apps > Pandectes EU Warranty & GARAN.
- Select the refresh button at the top right of the Storefront status card.
- Check the Widget (Product) row. It shows how many products the block now covers, and the warning about other templates disappears once every template has the block.
- Open a product that previously showed nothing and confirm the notice appears under Add to cart.
If a product still shows nothing after this, see Why the legal guarantee notice is not showing on a product page.
FAQ
Can Pandectes add the block to all templates for me?
No. App blocks are placed by the merchant in the theme editor, and Shopify gives apps no way to write them into a template. This is the same for every app that uses theme blocks.
Do I have to repeat this when I switch themes?
Yes. Blocks belong to a theme. A new theme, or a duplicate you later publish, starts without the block on any template.
Do I need to change the app settings for each template?
No. The block only marks the position. Texts, display mode, styling, and exclusions live in the app and apply to every template.
What about the cart?
The cart is a separate placement on the Plus plan. You add it from the Dashboard with Add to cart page. See How to show the legal guarantee notice in the cart.
Related articles
- How to install and set up Pandectes EU Warranty & GARAN
- How to configure the legal guarantee notice
- Why the legal guarantee notice is not showing on a product page
Updated on: 08/10/2026
Thank you!