
How to install and set up Pandectes EU Warranty & GARAN
Overview
Setting up Pandectes EU Warranty & GARAN takes four steps: tell the app what you sell, add two things to your theme, choose how the notice opens, and sync the official artwork. The app walks you through all four the first time you open it.
The notice does not go live until the artwork sync finishes, so plan to complete step 4 rather than stopping halfway.
Before you start
- An Online Store 2.0 theme, so the product template accepts app blocks.
- Access to the theme editor for your published theme. The app checks the published theme, not a draft or duplicate.
- Your storefront password page turned off if you want to verify the result yourself.
Install the app
- Install Pandectes EU Warranty & GARAN from the Shopify App Store.
- Open Shopify Admin > Apps > Pandectes EU Warranty & GARAN.
The app opens on Setup. You can leave at any time with Skip setup and configure everything manually later. Once you finish or skip, the app menu shows Dashboard, Notice & label, Garan label list, Visibility options, and Plan.
Step 1: Store type
This sets sensible defaults. You can change all of it later.
- Tick We sell physical consumer goods to shoppers in the EU. This is what makes the mandatory notice apply.
- Tick We also sell digital products, gift cards, or B2B if that is true. It drives the default exclusions so the notice does not appear where it should not.
- Under Where do you sell? choose EU only or Worldwide.
Choosing EU only limits the notice to EU markets. You can change that later with EU markets only on the Visibility options page.
- Select Next.
Step 2: Theme placement
Two sub-steps. The icon turns into a green check once the app detects the change.
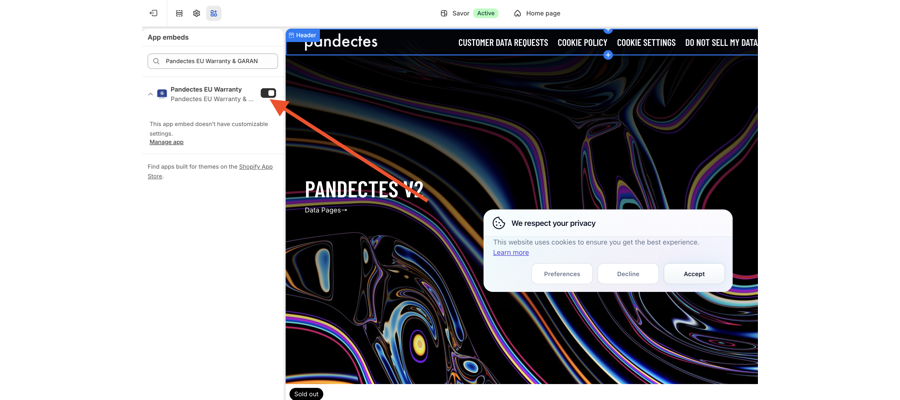
Enable the Pandectes EU Warranty app embed
- Select Enable app embed. The theme editor opens on App embeds.
- Find Pandectes EU Warranty. You can search for "Pandectes EU Warranty & GARAN".
- Turn the toggle on.
- Save the theme.
- Return to the app.
Add the Legal Notice block
- Select Add notice block. The theme editor opens on the Default product template.
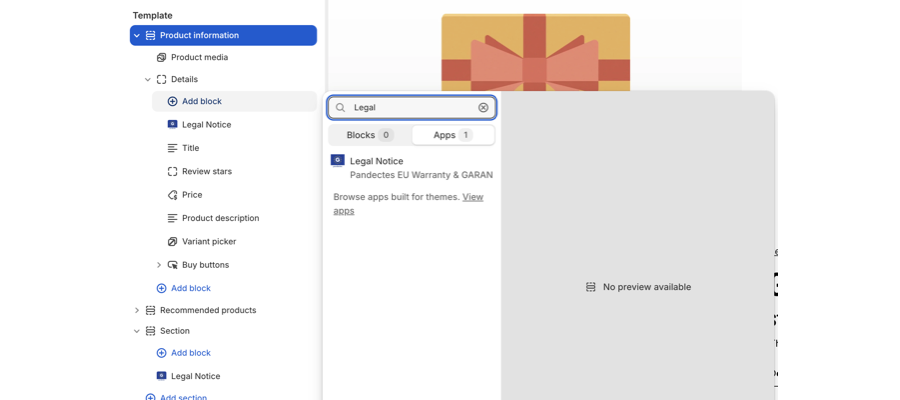
- In the left sidebar, open Product information > Details and select Add block.
- Search for Legal, open the Apps tab, and select Legal Notice (Pandectes EU Warranty & GARAN).
- Drag Legal Notice to where you want it inside Details. The preview on the right shows the notice straight away.
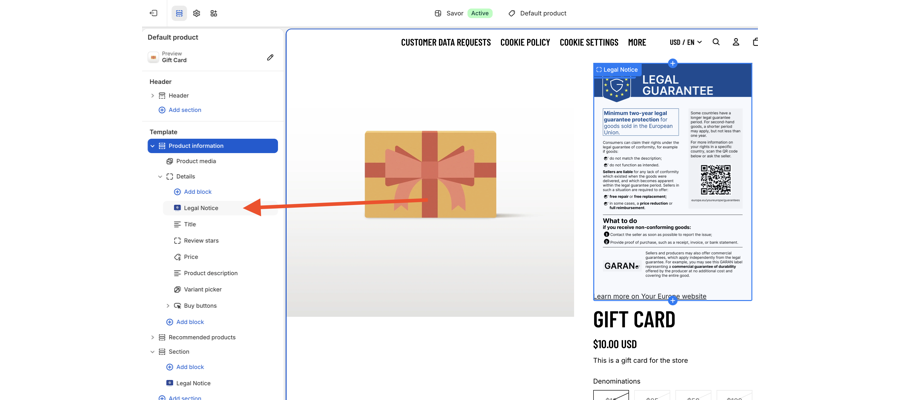
- Save the theme.
- Return to the app.
product.subscription.json, product.bundle.json, or any other alternate product template, add the block to each one. Products on a template without the block show nothing. See How to add the Legal Notice block to multiple product templates.- Select Next.
Step 3: Notice defaults
- Under Legal notice, choose how the notice opens on the product page:
- As a popup: a trigger that opens the artwork in a dialog.
- Collapsed: a summary that expands to the artwork.
- Always visible: the artwork renders inline on page load.
- Under Default language, pick the language shoppers see when their store language has no match.
- Check the Preview panel on the right. It uses dummy product data.
- Select Next.
Step 4: Official artwork
The app uploads the official colour notice images for all 24 EU languages into your Shopify files in one batch.
- Select Start artwork job.
- Wait. The counter moves from 0 of 24 ready towards 24 of 24 ready while Shopify processes the uploads.
- The card turns green and reads Official notice artwork v1 is ready when it is done.
- Select Finish setup.
The notice stays off until every image finishes processing. A card reading Processing or Not synced means shoppers are not yet seeing the notice.
Confirm the install
Open the app Dashboard. The Storefront status card answers "is it installed?" without opening the theme.
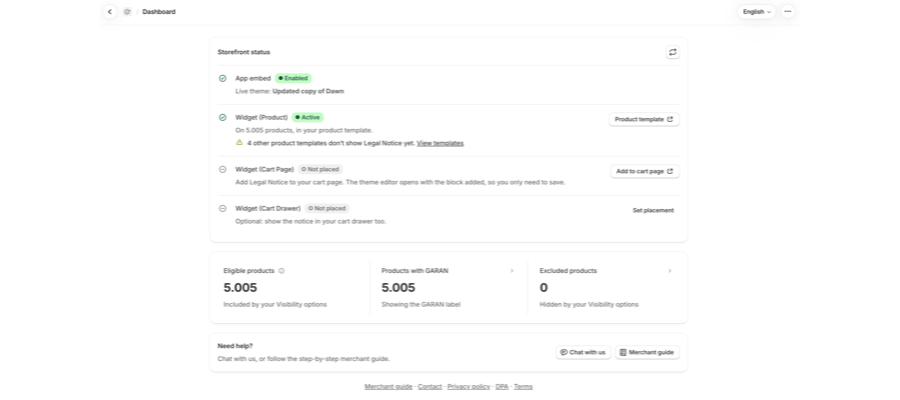
Row | Healthy state | What it means |
|---|---|---|
App embed |
| The Pandectes EU Warranty app embed is on. Your live theme is named underneath. |
Widget (Product) |
| The Legal Notice block is on your product template, for example "On 120 products, in your product template." |
Widget (Cart Page) |
| Optional. Shows the notice on your cart page. See the cart article below. |
Widget (Cart Drawer) |
| Optional. Shows the notice in your cart drawer too. |
Use the refresh button at the top right of the card to re-run the theme check after you save the theme.
Each row also has a shortcut:
- If the app embed is off, the App embed row shows an Enable app embed button that opens App embeds in the theme editor.
- Product template, on the Widget (Product) row, opens your product template so you can add or move the Legal Notice block.
- If other product templates are missing the block, the row warns you, for example "4 other product templates don't show Legal Notice yet." Select View templates to see them.
Under the card, three tiles summarise the rest:
Tile | Meaning |
|---|---|
Eligible products | Products included by your Visibility options. |
Products with GARAN | Products showing the GARAN label. |
Excluded products | Products hidden by your Visibility options. |
If the artwork sync is still pending, the notice is not live yet. Go back to setup step 4 and finish it.
Then open a product page on your storefront. Depending on the display mode you picked, you should see either the artwork inline or a Legal guarantee trigger under Add to cart.
If nothing appears, work through Why the legal guarantee notice is not showing on a product page.
Next steps
- Adjust the look and the texts: How to configure the legal guarantee notice.
- Review which products are excluded: How to hide the legal guarantee notice on gift cards, digital goods and other products.
- Add GARAN data for products with a qualifying producer guarantee: How to add GARAN labels to your products.
- Show the notice in the cart as well: How to show the legal guarantee notice in the cart.
- Translate the notice texts: How to show the legal guarantee notice in your shoppers' languages.
Related articles
- The EU legal guarantee notice and GARAN label explained
- Basic or Plus: which Pandectes EU Warranty & GARAN plan do you need?
Updated on: 08/10/2026
Thank you!