
How to add GARAN labels to your products
Overview
The GARAN label is the harmonised visual for a producer's commercial guarantee of durability. Unlike the legal guarantee notice, it is voluntary and it applies to individual products, not to your whole catalogue.
You add GARAN data on the Garan label list page of the app: years, brand, and model per product. On the Plus plan you can also import and export that data in bulk.
Which products qualify
A product qualifies only when the producer offers a commercial guarantee of durability that is all three of the following:
- Free of charge for the consumer.
- Covering the whole product, not a single component.
- Lasting more than two years.
If any one of those is not true, leave GARAN off for that product. The mandatory legal guarantee notice still applies on its own.
This is the producer's commitment, not the retailer's. Pandectes cannot determine it for you, and neither can Shopify. If you resell other brands, you need the answer from each producer.
Before you start
- Finish the install and the artwork sync. See How to install and set up Pandectes EU Warranty & GARAN.
- Have the guarantee length, the brand name, and the model designation ready for each product.
- On Basic you can add GARAN data to up to 10 products. Plus is unlimited.
The Garan label list page
Open Shopify Admin > Apps > Pandectes EU Warranty & GARAN > Garan label list.
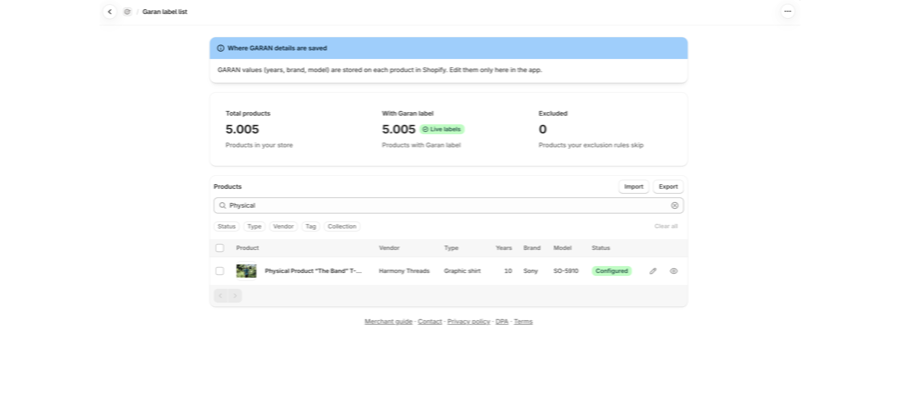
Three tiles sit at the top:
Tile | Meaning |
|---|---|
Total products | Products in your store. |
With Garan label | Products that have GARAN data. The |
Excluded | Products your Visibility options hide. |
The Products card below lists every product with its Vendor, Type, Years, Brand, Model, and Status, for example Configured or Not required.
Add GARAN data to a product
- Find the product. Use the search field, or the Status, Type, Vendor, Tag, and Collection filters. Clear all resets them.
- Select the pencil icon on that product's row.
- Fill in:
- Years: the length of the producer's durability guarantee, which must be more than 2.
- Brand: the brand as it should appear on the label.
- Model: the model designation as it should appear on the label.
- Save.
- Use the eye icon on the row to preview the result.
Rows with no data show a dash in those columns and a Status of Not required.
On Basic, the 11th product cannot be given GARAN data. If you need more, upgrade on the Plan page.
Import and export GARAN data (Plus)
On Plus, the Import and Export buttons on the Products card let you work with many products at once. On Basic they are greyed out. Hovering shows Available on the Plus plan with a View plans link.
Export
- Select Export.
- The app exports all your products and shows the progress as a percentage.
- Download the file when it is ready.
Import
- Select Import and choose a CSV file. Starting from an export is the simplest way to get the right format.
- A progress bar shows the upload.
- Check the review step before you confirm.
- If some rows could not be imported, download the file of rows with problems, fix them, and import that file again.
On Plus, the Configured status filter pages through all your GARAN products, not only the first page.
Turn the label on for your storefront
Adding data to a product is not enough by itself. The label also has to be switched on:
- Open Notice & label > Style.
- In the Product page card, under Show, select Legal notice & GARAN.
The GARAN label then appears on products that have GARAN data, and only on those. Products without it continue to show the legal guarantee notice alone.
How it looks to a shopper
Online, the regulation allows a nested display: the label can sit behind an expandable control rather than being fully open. That is what the Show full GARAN label link does. It is a permitted presentation, not a shortcut.
In Collapsed notice mode, the GARAN block renders outside the collapsed disclosure. A product page showing a GARAN mark but no legal guarantee artwork until you click is the expected look of that combination.
If the GARAN label does not appear
Check these in order:
- Notice & label > Style > Show is set to Legal notice & GARAN.
- The product has Years, Brand, and Model filled in on the Garan label list page.
- You are under the Basic 10-product cap.
- The product is not in the excluded products table on Visibility options.
If all four are fine and the label is still an empty gap, see Why the legal guarantee notice is not showing on a product page.
Related articles
- The EU legal guarantee notice and GARAN label explained
- How to configure the legal guarantee notice
- Basic or Plus: which Pandectes EU Warranty & GARAN plan do you need?
Updated on: 08/10/2026
Thank you!