
How to add the legal guarantee notice to your order confirmation email
Overview
EU guidelines say the legal guarantee notice should also appear in the order confirmation email, not only on the product page. Pandectes EU Warranty & GARAN gives you a block of code that adds it, on every plan, Basic included.
Shopify does not let apps edit your email templates. So you add the block yourself, either by letting the app insert it into a copy of your template (Add it automatically) or by pasting a snippet (Add it by hand). Nothing changes in Shopify until you save the template there.
The block takes the look of your own email. For each order line that has GARAN data (years, brand, model), it also shows the official GARAN label image, with the details as text below it for email apps that hide images, and the GARAN product image beside the product name.
Before you start
- The app installed. See How to install and set up Pandectes EU Warranty & GARAN.
- Access to Shopify Admin > Settings > Notifications.
- Optional: GARAN data on your products, so the label shows in the email. See How to add GARAN labels to your products.
Open the email setup
- Open Shopify Admin > Apps > Pandectes EU Warranty & GARAN. The Dashboard opens.
- On the Storefront status card, find the Order confirmation email row. It reads
Not added yetuntil you mark it as added. - Select How to add it. The Order confirmation email window opens.
You can also reach the same step during onboarding, on step 4, Order confirmation email. That step is optional.
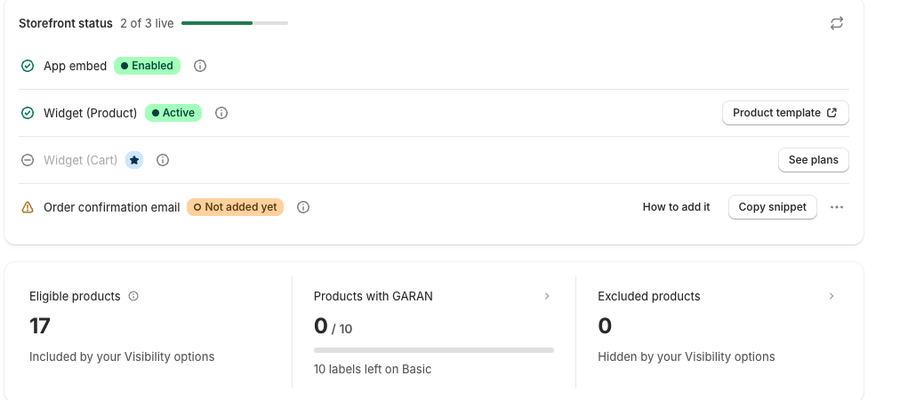
The window offers two ways to add it, under How to add it.
Option 1: Add it automatically
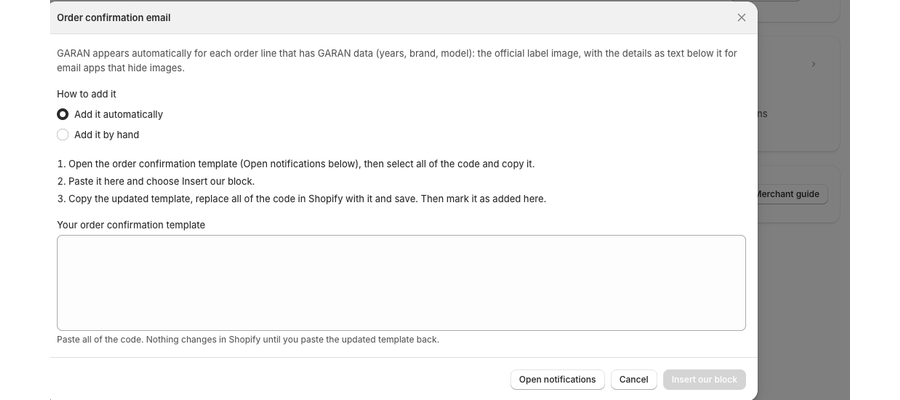
- Select Open notifications. In Shopify, open the Order confirmation template and choose Edit code.
- Select all of the code and copy it.
- Back in the app, paste it into Your order confirmation template and select Insert our block.
- When the app says "Done", select Copy updated template.
- In Shopify, replace all of the code with the updated template and Save.
- Send yourself a test email and check the notice at the bottom.
- Back in the app, select Mark as added.
Paste all of the code, not just part of it. The app inserts its block at the end of the email, just before the closing </body> tag. Nothing changes in Shopify until you paste the updated template back and save.
If the app shows an error:
Message | What to do |
|---|---|
Paste your order confirmation template first. | The box is empty. Paste the code from Shopify. |
This template is too large. Paste only the order confirmation template. | You pasted more than the order confirmation template. |
This text can't be read as a template. | Copy the code again from Shopify and paste it again. |
We couldn't find where the email ends (). | Paste the whole template, or use Option 2. |
Our block in this template was changed by hand. | Remove the old block, then try again. |
Option 2: Add it by hand
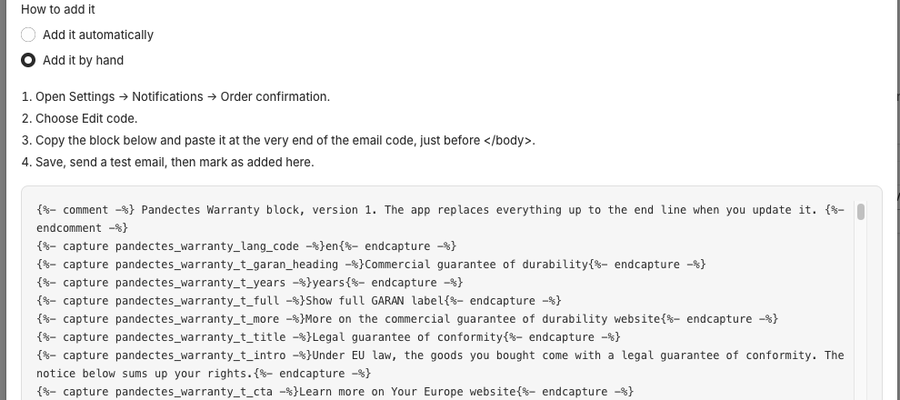
- Open Settings > Notifications > Order confirmation.
- Choose Edit code.
- Select Copy snippet in the app. Paste the block at the very end of the email code, just before
</body>. - Save, send a test email, then select Mark as added in the app.
You can also select Copy snippet straight from the Order confirmation email row on the dashboard.
Mark it as added
Shopify does not let apps read your email template, so the app cannot check it for you. Once you have saved the template, select Mark as added. The row then reads Marked as added, and the Setup report shows what you marked. If you change your mind, select Mark as not added.
Update the block later
The block is versioned. If you paste a newer block on top of an older one, or run Insert our block again, the app replaces the old block instead of adding a second one.
Check the result
- Place a test order, or send a test email from the template.
- Open the email. The legal guarantee notice sits at the end of the email.
- For an order line with GARAN data, check that the GARAN label shows below the product.
Related articles
- How to install and set up Pandectes EU Warranty & GARAN
- How to add GARAN labels to your products
- How to print or save the setup report as a PDF
- The EU legal guarantee notice and GARAN label explained
Updated on: 27/10/2026
Thank you!